Friday, March 31, 2023

VAC - Advanced Excel Techniques - Date Functions

Date Functions are helpful to work around the date and time.  The following are the few of the date functions available in the Excel. 

The main function to calculate dates in Excel:

  • DATE function


Get current date and time:

  • TODAY - returns today's date
  • NOW - returns the current date and time


Convert dates to / from text:

  • DATEVALUE - converts a date in the text format to date format
  • TEXT - converts a date to a text value


Retrieve dates in Excel:

  • DAY - returns the day of the month
  • MONTH - returns the month of a specified date
  • YEAR - returns the year of a specified date
  • EOMONTH - returns the last day of the month
  • WEEKDAY - returns the day of the week
  • WEEKNUM - returns the week number of a date


Calculate date difference:

  • DATEDIF - returns the difference between two dates
  • EDATE - returns a date N months before or after the start date
  • YEARFRAC - calculates the fraction of the year between 2 dates  (it is used to calculate the age by providing the date of Birth and today date).


Calculate workdays:

  • WORKDAY - returns a date N working days in the future or in the past
  • NETWORKDAYS - returns the number of workdays between two dates

Thursday, March 16, 2023

VAC - Advanced Excel Techniques - Sorting & Filter

 Sorting and filtering are two important features available in Microsoft Excel.  It is widely used for the data analysis.  With these two features, the data shall be organized, arranged and filtered.

References: 

1. https://www.simplilearn.com/tutorials/excel-tutorial/how-to-sort-data-in-excel

2. https://www.futurelearn.com/info/courses/data-analytics-for-business-creating-databases/0/steps/177397

3. https://www.learnexcelnow.com/sorting-and-filtering-data-with-excel/


VAC - Advanced Excel Techniques - Functions

 Excel provides rich set of built in functions.  The following are the list of categories of functions.

  • Financial Functions
  • Logical Functions
  • Text Functions
  • Date and Time Functions
  • Lookup & Reference Functions
  • Math Functions
  • Statistical Functions
  • Information Functions 
  • Web
  • Cube
  • Trigonometric


To insert a function

Select the Cell
Goto Function Wizard and select the function  
Give values / cells for the parameters.

The following are the web resources gives you detailed information and  usage of the functions.

Tuesday, March 14, 2023

VAC - Advanced Excel Techniques - Conditional Formatting

 In this post, you can know how to work with Conditional Formatting

Conditional Formatting

·         Conditional formatting is used to change the appearance of cells in a range based on your specified conditions.

·         The conditions are rules based on specified numerical values or matching text.

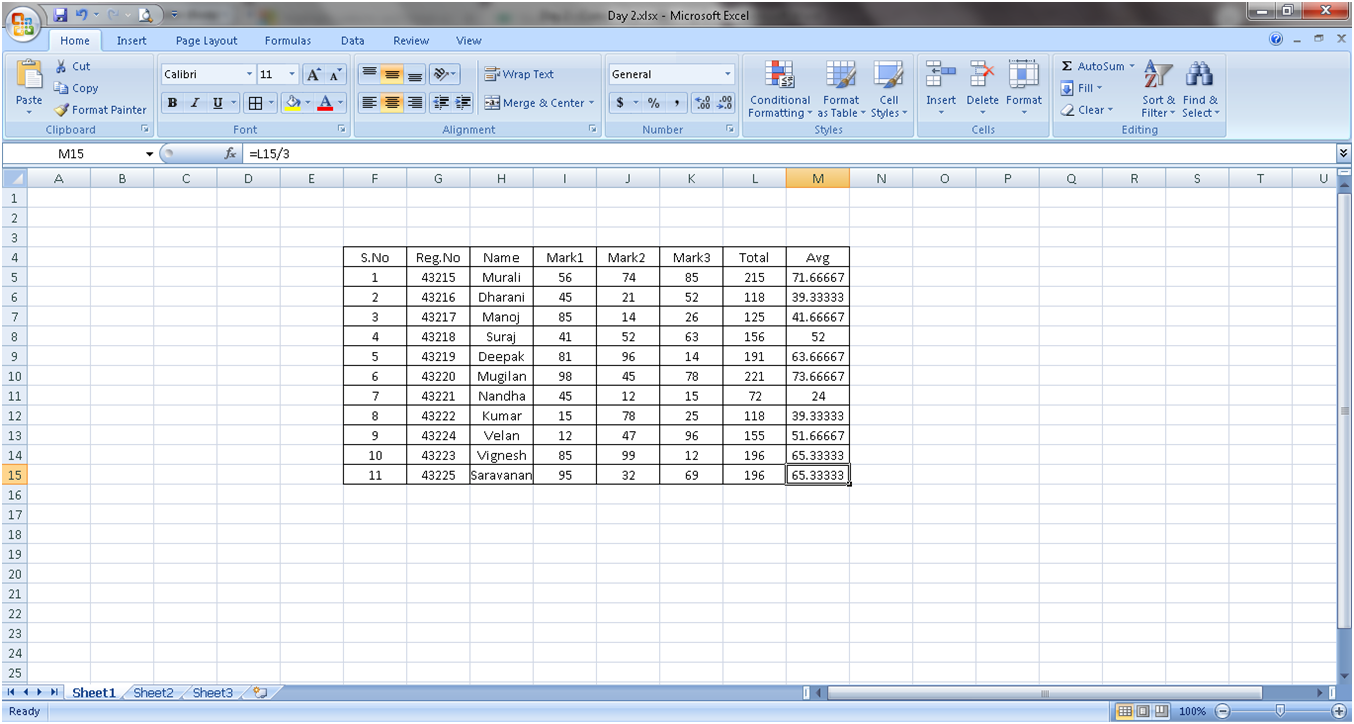
First create a table of data as shown in the following


Apply the formula for total and Average

For total in the Cell L5    type the following

=I5+J5+k5

For average in the cell M5 type the following

= L5/3.0


Now the total and Average is calculated.

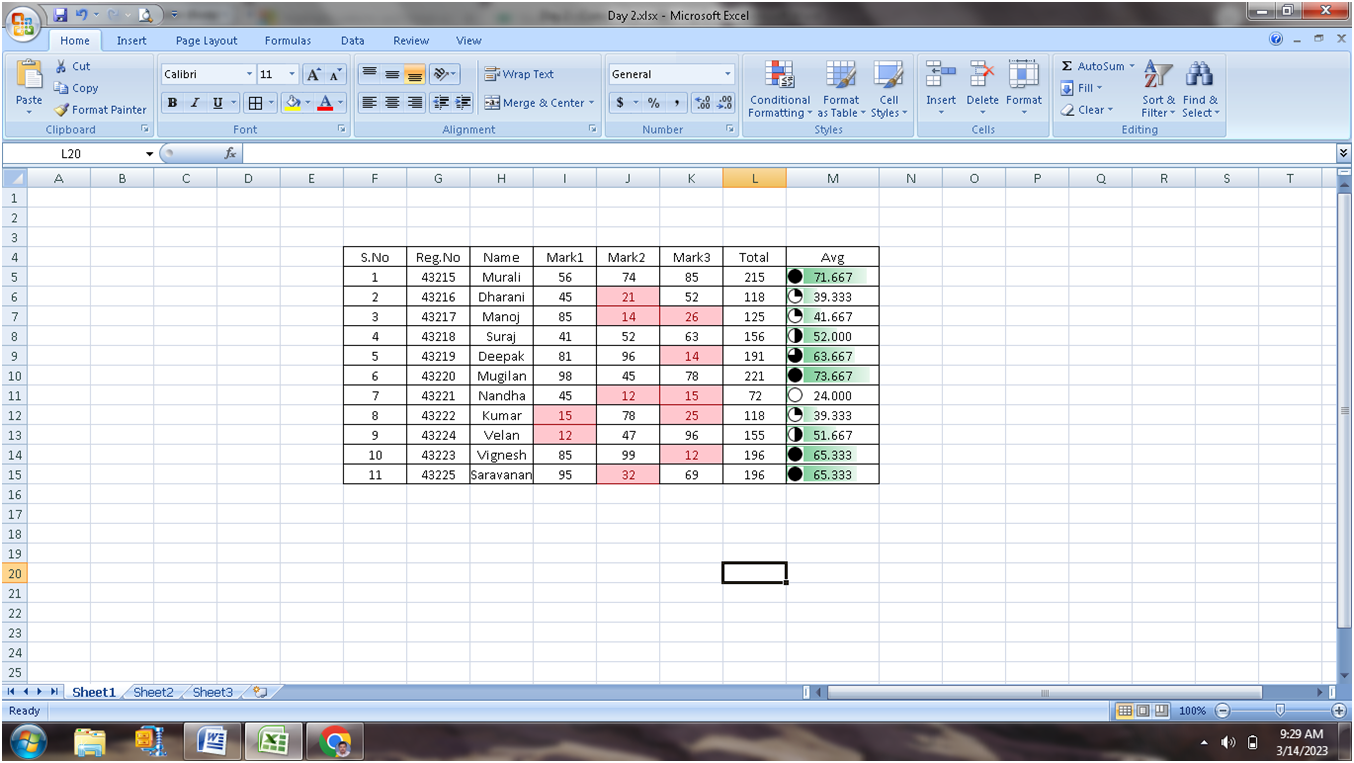
Now you can format the Column M via color scale based on the values.

Step 1 : Select the value M5 to M15

Step 2 : Click conditional Formatting in the Style (group) of Home Toolbar.


Select Color Scales and select the color pattern you want.


Similarly, you can apply the following  


Highlight the cell, if the cell value is greater than or lesser than the value mentioned.


Marks are selected from I5 to K15.

Select the Highlight Cells Rules, Select Less than.   (The objective is to highlight the marks which are less than 40).


Now apply Databar.

Select the Average – M5 to M15 and

Select the Conditional Formatting and Click Data Bar


Select the Color and show the data bar appeared in each cell.


Each value has the bar based on the value.


Try ICON SETS


Based on the cell Value the Icon will be appeared in front of the value.

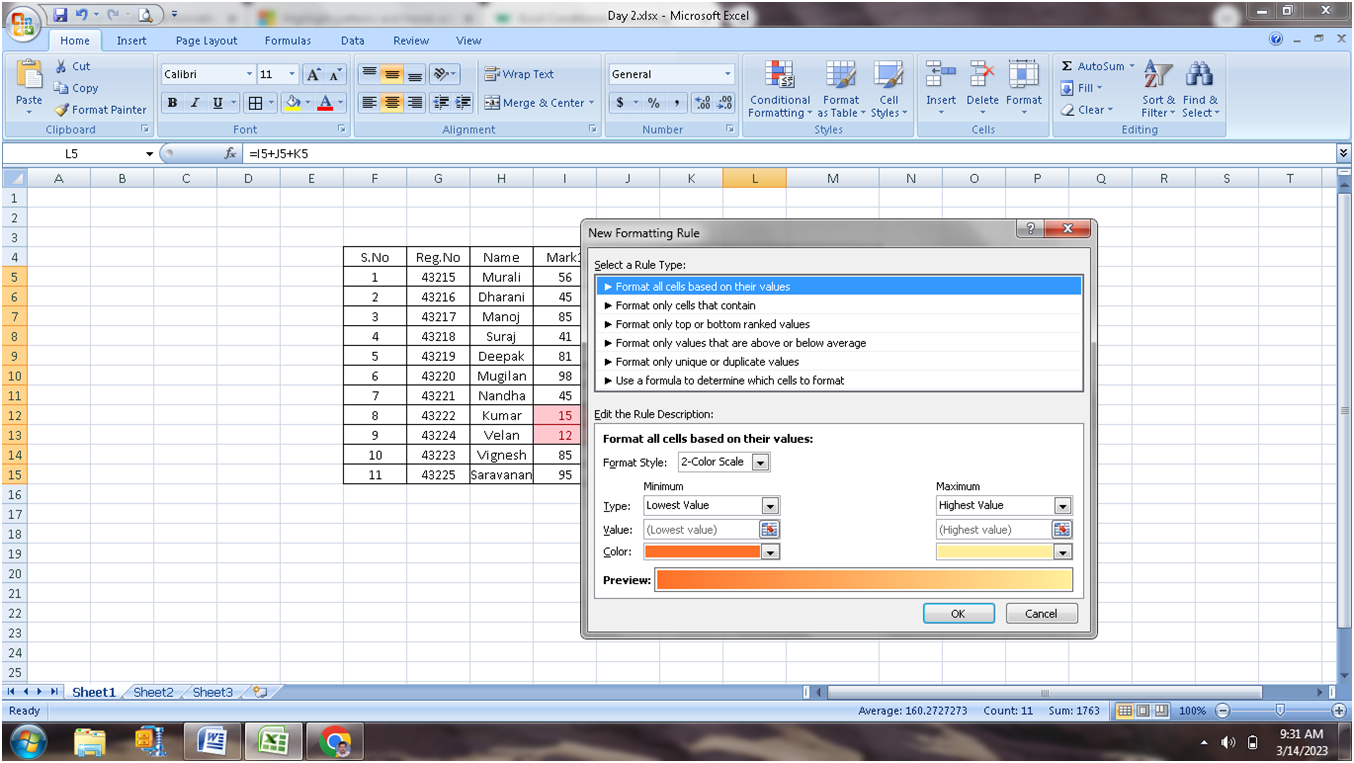
Creating New Rule:

1.       Select Total Column

2.       Select New Rule


3.       Click New Rule


For the total between 100 to 200 is to highlighted with Red Border – Yellow background and text in Blue Color.


Click format and select the color needed.


Click OK to apply the format


 Clear the Rules:

 Formatting applied in the sheet shall be cleared either as whole for the entire sheet or clear for the selected cells.


Click “clear rules from Selected Cells”


To View all the Formatting rules applied

Click Manage Rule in the Conditional Formatting Submenu.

Show formatting rules for the “This Worksheet”

From here you can create new, modify the existing and delete the rules.

Kindly practice the same and get expert in formatting the data.


Tuesday, March 7, 2023

VAC - Advanced Excel - Session 1 - Excel Basics

 Session 1 : Formatting & Managing your Worksheet & workbook


VAC - Advanced Excel - Session Topics


Name of the Course : Advanced Excel Techniques

Duration of the Course : 30 Hours

Pre-Requisite:

·         Must know the fundamentals of Excel – Workbook, Sheet, Cell, Saving Workbook.

·         Commitment to spend at least two hours per week practicing the skills introduced in the course.

Course Objective:

·         master the skills of working with: diagrams, Microsoft Excel and sorts;

·         learn to use this software confidently;

·         understand the advanced functions of Excel: the user interface of Excel

·         Ability to competently navigate the Excel user interface; performs basic calculations using formulas and functions, professionally format spreadsheets and create data visualizations using charts and graphs.

Course Outcome:

·         Speedy data analysis

·         Better Understanding of Excel functionalities

·         Time Saving in data processing

·         Reaching deep into data and seeing the unseen truth

·         Learn to present data in better and understanding way

Topics Covered:

EXCEL BASICS - FORMATS, CONDITIONAL FORMATTING & SORTING - DATA MANAGEMENT - FORMULAS & FUNCTIONS - CHART & GRAPHS - DATA ANALYSIS (Pivot Table)

Topic

Formatting & Managing your Worksheet & workbook

Basic Formulas, Number Formats & Working

Conditional Formatting Data Bars, Colour Scales & Icon Sets,

Conditional formatting with formulas

Sorting basic & advance

Filters Basic & Advance

Data from other Sources

Data Validation and dealing with Invalid Data

Text Formulas : Exact, Find, Upper, Proper, Left, Right, Mid & many more

Lookup Formulas : Vlookup, Hlookup, Lookup, Match etc..

Logical Formulas: If, AND, OR, NOR etc…

Date & Time Formulas : Today, Now, Years, etc..

How & when to apply Nested Functions

Chart Basics: What, When & How

Line Chart - Column Chart

Creating a PivotTable

Selecting What Appears in a PivotTable

Scenario Modelling

Goal Seek

Macro – Recording a Macro


Thursday, March 2, 2023

SQL - Structured Query Language - DDL - DML - DCL - TCL Commands

 Structured Query Language (SQL) is desinged for the retrieval of data from the database.  Also it is used to manage the data in the database. SQL is also called as Database Langugae.  It is english like so easy to human understanding. 

Databases like - Oracle, MS Access, MySQL, PostgreSQL, MS SQL uses SQL as a standard language for database management.

For the management and retrieval of data from database, SQL has the following categories of commands.

  • DDL - Data Definition Language
  • DML - Data Manipulation Language
  • DCL - Data Control Language
  • TCL - Transaction Control Language

The following tutorials will give detailed explanation on each of the SQL Commands.

  • DDL - Create, Alter, Drop, Truncate
  • DML - Select, Insert, Update, Delete
  • DCL - Grant, Revoke
  • TCL - Commit, Rollback

Tutorials :  Geeksforgeeks    Javatpoint

Wednesday, March 1, 2023

How to access Live SQL provided by Oracle?

 Dear Students,

Kindly follow the below steps to access the Live SQL provided by Oracle.

In order to access the Oracle - Live SQL, Oracle account is required.  Kindly follow the URL provided below to create an oracle account.

To create Oracle Account :  https://docs.oracle.com/en/cloud/get-started/subscriptions-cloud/csgsg/get-oracle-com-account.html

Once the Oracle Account is created, then 

Step 1 : Click the link https://livesql.oracle.com/


Step 2 : Click Sign in (top-right of the screen).

Step 3 : Enter the Username and Password of the Oracle Account created earlier.
Step 4 :  Click Start Coding
Step 5 :  In the SQL Worksheet - Try the DDL & DML SQL Query statements.